February 12, 2017

Leaves shaker card

Hello everyone,
Hope you're all having a great Sunday!
Today I want to share with you a shaker card I made using the negative space from die cuts.
Coucou les amis,
J'espère que vous passez un bon dimanche! Aujourd'hui je partage avec vous une carte shaker réalisée avec la découpe négative de die cuts.


I started by die cutting a Stitched rectangle from Kraft cardstock and stamped Woodgrain Backdrops in brown ink.
I die cut the Leaves from watercolor paper and colored in with Distress inks.
I also die cut leaves out of the woodgrain panel and fun foam. (I saved the positive die cuts for another project)
A greeting from the Scripty Sayings stamp set was stamped using Versamark ink and heat embossed with white embossing powder.
J'ai débuté ma carte en coupant du papier Kraft avec le die Stitched rectangle, ensuite j'y ai tamponné le Woodgrain Backdrops à l'encre brune.
J'ai coupé des feuilles dans du papier aquarelle avec le die Small Stitched Leaves et les ai mises en couleur avec des encres Distress.
J'ai également coupé des feuilles dans mon fond "bois" ainsi que dans du fun foam. (J'ai gardé les découpes positives de côté pour un autre projet)
Un sentiment du set Scripty Sayings a été tamponné à l'encre Versamark et embossé à chaud avec de la poudre blanche.


Next, I glued the leaves to a top fold card base using the negative space of the woodgrain panel as a guide.
I assembled the shaker parts (panel + acetate + fun foam) and filled it with gold glitter flakes.
Finally I stamped, colored (Promarkers), die cut the cute fox from the Joy to the woods stamp set and adhered to the front of the card.
Ensuite, j'ai collé les feuilles à ma base de carte en utilisant les espaces négatifs du panneau "bois" comme guide.
J'ai assemblé les éléments de la shaker (panneau bois + acétate + fun foam) et y ai ajouté des grosses paillettes dorées.
Pour finir, j'ai tamponné, colorisé (Promarkers), coupé avec son die le petit renard du set Joy to the woods puis adhéré sur le devant de ma carte.


Supplies / Matériel
Stamps/Tampons: Woodgrain Backdrops stamp set, Scripty Sayings stamp set and Joy to the woods stamp set from Lawn Fawn
Dies: Stitched Rectangle die, Small Stitched Leaves, Joy to the woods die cuts from Lawn Fawn
Paper/Papier: Neenah Desert Storm Kraft Cardstock
Inks/Encres: Distress inks, Intense Black ink (Hero Arts)
Embossing powder/Poudre à embosser: Opaque Bright White (Wow) Coloring Medium/Colorisation: Promarkers
Others/Autres: Gold glitter flakes - Grosses paillettes dorées

I hope you enjoyed the card! Thank you so much for stopping by today ❤
J'espère que cette carte vous a plu! Merci beaucoup de votre visite ❤

February 09, 2017

You're cool! - Slider Card

Hello friends,
Hope you're all having a wonderful day!
Today, I'd like to share a slider card I made using the Winter bunny stamp set and the Slide on over die.
Salut les amis,
J'espère que vous passez une agréable journée!
Aujourd'hui, je partage avec vous une carte "slider" réalisée avec le set Winter bunny et le die Slide on over.


I first stamped, colored (Zig Clean Color Markers) and fussy cut the critter from the Winter bunny stamp set and the mushrooms from the Gleeful gardens stamp set.
For the background of the card I die cut two rectangles from white cardstock using a Stitched rectangle die. From one of the rectangles I die cut a border using the Stitched hillside border die and stamped a greeting from the Snow Cool stamp set along the bottom edge.
I applied Distress inks (Blueprint Sketch and Picked Raspberry) to the background panel with a blending tool.
J'ai commencé par tamponner, coloriser et découper le lapin du set Winter bunny et les champignons du set Gleeful gardens.
Pour le fond de ma carte, j'ai coupé deux rectangles dans du cardstock blanc avec le die Stitched rectangle. J'ai utilisé l'un des deux pour y couper une bordure colline à l'aide du die Stitched hillside border et y ai tamponné un sentiment du set Snow Cool.
J'ai appliqué des encres Distress (Blueprint Sketch and Picked Raspberry) sur l'autre rectangle avec un "blending tool".


Next, I cut out a slider track using a Slide on over die from the distressed panel. I glued the cut out piece to a top fold card base, I used the distressed panel as a guide.
I attached foam tape behind it, then put a penny behind the track and added foam adhesive to it.
I glued the hill border, the mushrooms to the background panel and the bunny to the penny.
Finally, I adhered the whole thing to the card base.
I finished the card with a scattering of mini stars confetti.
Ensuite, pour réaliser l'ouverture de la "slider", j'ai coupé dans mon panneau Distress avec le die Slide on over. J'ai collé l'intérieur de la découpe obtenue sur une base de carte en prenant le fond Distress comme guide.
J'ai attaché du foam à l'arrière de mon fond, j'ai placé un cent derrière l'ouverture de la "slider" et y ai ajouté du foam au dessus.
La bordure colline, les champignons ont été collés au fond Distress et le lapin au centime.
Enfin, j'ai adhéré le tout à ma base de carte.
Pour terminer, j'ai ajouté quelques mini confettis étoiles.


Supplies / Matériel
Stamps/Tampons: Winter bunny stamp set, Gleeful gardens stamp set and Snow Cool stamp set from Lawn Fawn
Dies: Stitched Hillside borders and Slide on over dies from Lawn Fawn
Inks/Encres: Intense Black ink (Hero Arts), Distress inks (Blueprint Sketch and Picked Raspberry)
Coloring Medium/Colorisation: Zig Clean Color Real Brush Markers
Accessories/Accessoires: A penny - Un centime, Mini stars confetti - Mini confettis étoiles

Thank you so much for stopping by today ❤
Merci beaucoup de votre visite ❤

February 02, 2017

We mermaid for each other (Lawn Fawn)

Hi everyone,
I'm popping in quickly to share a cute Valentine's Day card using the Mermaid for you stamp set.
Salut,
Me revoilà aujourd'hui avec un post rapide pour vous montrer une adorable carte de Saint-Valentin réalisée avec le set Mermaid for you.


I first cut a piece of watercolor paper using the Stitched rectangle die and then used the ink smooching technique with Distress inks.
I stamped, colored (Zig Clean Color Markers) and die cut the images.
The sentiment was stamped with black ink.
I adhered the watercolor panel and the images to a top fold card base.
To finish off the card, I added some clear droplets.
J'ai coupé avec le die Stitched rectangle dans du papier aquarelle, j'ai ensuite utilisé la technique du "ink smooching" avec des encres Distress.
J'ai tamponné, colorisé (Marqueurs Zig Clean Color) et coupé avec les dies respectifs les images.
Le sentiment a été tamponné à l'encre noire.
J'ai adhéré mon panneau aquarellé et les images à ma base de carte.
J'ai terminé en ajoutant quelques gouttelettes transparentes.


Supplies / Matériel
Stamps/Tampons: Mermaid for you (Lawn Fawn)
Dies: Mermaid for you and Stitched rectangle dies from Lawn Fawn
Coloring Medium/Colorisation: Zig Clean Color Real Brush Markers
Inks/Encres: Distress inks (Tumbled Glass, Broken China and Salty Ocean), Intense Black ink (Hero Arts)
Accessories/Accessoires: Clear Droplets - Gouttelettes transparentes (Pretty Pink Posh)

That's all for today, I hope you enjoyed today's card! Thank you so much for stopping by ❤
C'est tout pour aujourd'hui, j'espère que cette carte vous a plu! Merci beaucoup de votre visite ❤

January 26, 2017

You are my otter half (My Favorite Things)

Hello everyone,
I'm back today with a Valentine's Day card using the Mirror stamping technique, this fun technique allows you to reverse the original image.
Salut les amis,
Je suis de retour aujourd'hui avec une carte de Saint-Valentin pour laquelle j'ai utilisé la technique du miroir, cette amusante technique permet d'obtenir l'image originale à l'envers.


For this technique I used the Misti. I stamped the otter from the Otterly Love You stamp set onto white cardstock with Versafine Onyx Black ink.
To create the mirror image, I inked the otter up again and stamped it onto the Mirror Image stamp.
Then, I pressed the mirror stamp down onto the cardstock to transfer the mirrored image onto my paper.
I colored (Promarkers) and fussy cut them.
J'ai utilisé le Misti pour réaliser cette technique. J'ai tamponné la loutre du set Otterly Love You à l'encre noire Versafine sur du cardstock blanc.
Pour créer l'image miroir, j'ai à nouveau encré la loutre et tamponné celle-ci sur le tampon Mirror Image.
J'ai ensuite pressé le tampon miroir sur mon papier afin de transférer l'image dessus.
J'ai colorisé (Promarkers) et decoupé les deux loutres.


For the background, I stamped Whimsical Waves Background on white cardstock with Versafine Onyx Black ink and heat embossed in clear.
Next, I cut a piece of vellum and I die cut a heart using the Stitched Heart Die-namics, then watercolored it with Distress inks (Barn Door and Festive Berries). Once dried, I stamped the sentiment using Versamark ink and heat embossed with white embossing powder.
I adhered the panel, the piece of vellum and the heart to a top fold card base.
The critters were popped up with foam adhesive for some dimension.
Pour le fond, j'ai tamponné Whimsical Waves Background sur du cardstock blanc à l'encre noire Versafine et embossé à chaud à la poudre transparente.
Ensuite, j'ai coupé un coeur dans du papier aquarelle avec le die Stitched Heart sur lequel j'ai appliqué des encres Distress (Barn Door et Festive Berries) avec un pinceau et un peu d'eau. Une fois sec, j'ai tamponné le sentiment à l'encre Versamark et embossé à chaud en blanc.
J'ai adhéré le panneau, le papier calque et le coeur à ma base de carte.
J'ai ajouté du foam adhésif à l'arrière de mes loutres pour plus de dimension.


Supplies / Matériel
Stamps/Tampons: Otterly Love You, Mirror Image and Whimsical Waves Background (My Favorite Things)
Dies: Stitched Heart Die-namics (My Favorite Things)
Coloring/Colorisation: Promarkers, Distress inks
Inks/Encres: Versafine Onyx Black ink and Versamark ink
Embossing powders/Poudres à embosser: Opaque Bright White and Clear Gloss (Wow)

Thank you so much for stopping by ❤
Merci beaucoup de votre visite ❤

January 24, 2017

Otterly Love You (My Favorite Things)

Hi everyone,
Today, I want to share with you my card for the MFT Wednesday Sketch Challenge (#316).
Here's a look at the sketch.
Coucou les amis,
Aujourd'hui, je partage avec vous la carte que j'ai réalisée pour le MFT Wednesday Sketch Challenge (#316).
Un petit coup d'oeil sur le sketch.


And here's my interpretation of it!
Voici mon interprétation!


I stamped the adorable otters from the Otterly Love You stamp set, colored them with Promarkers and die cut a circle out of the panel.
The patterned paper is from the Fresh Squeezed Chevron paper pack.
I used the heart border die that comes as part of the Stitched Strip Die-namics to die cut little hearts out of black cardstock. Trimmed into a strip and adhered a piece of white cardstock behind.
To finish my card, I adhered the patterned paper, the strip, the circle piece and the sentiment banner to a top fold card base and added some sequins.
J'ai tamponné les adorables loutres du set Otterly Love You, les ai colorisées aux Promarkers et coupé avec un die circulaire dedans.
J'ai utilisé le papier imprimé Fresh Squeezed Chevron.
J'ai ensuite coupé des petits coeurs dans du cardstock noir à l'aide d'une bordure se trouvant dans le set de découpe Stitched Strip. Je l'ai coupé en une bande et collé un morceau de cardstock blanc à l'arrière.
Ensuite, j'ai adhéré le papier imprimé, la bande noire, le cercle et la bannière avec le sentiment à ma base de carte.
Pour la touche finale, j'ai ajouté quelques sequins.


Supplies / Matériel
Dies: Die-namics Rectangle Stax (set 2), Die-namics Circle Stax (set 1) and Die-namics Stitched Strip from MFT
Stamps/Tampons: Otterly Love You (MFT)
Coloring Medium/Colorisation: Promarkers
Paper/Papier: Fresh Squeezed Chevron pack (MFT)
Accessories/Accessoires: Sequins

Thank you so much for stopping by ❤ See you soon!
Merci de votre visite et à bientôt ❤

January 19, 2017

Layers of love (Concord & 9th)

Hello friends,
I hope you are having a wonderful Thursday!
Sorry it's been so long since my last post, life just got in the way...
But I'm ready to throw myself back at it for 2017 ^_^
Salut les amis,
J'espère que vous passez une merveilleuse journée!
Je m'excuse de mon absence ces derniers temps sur le blog, la vie réserve parfois des surprises...
Mais je suis de retour et prête à m'y remettre ^_^


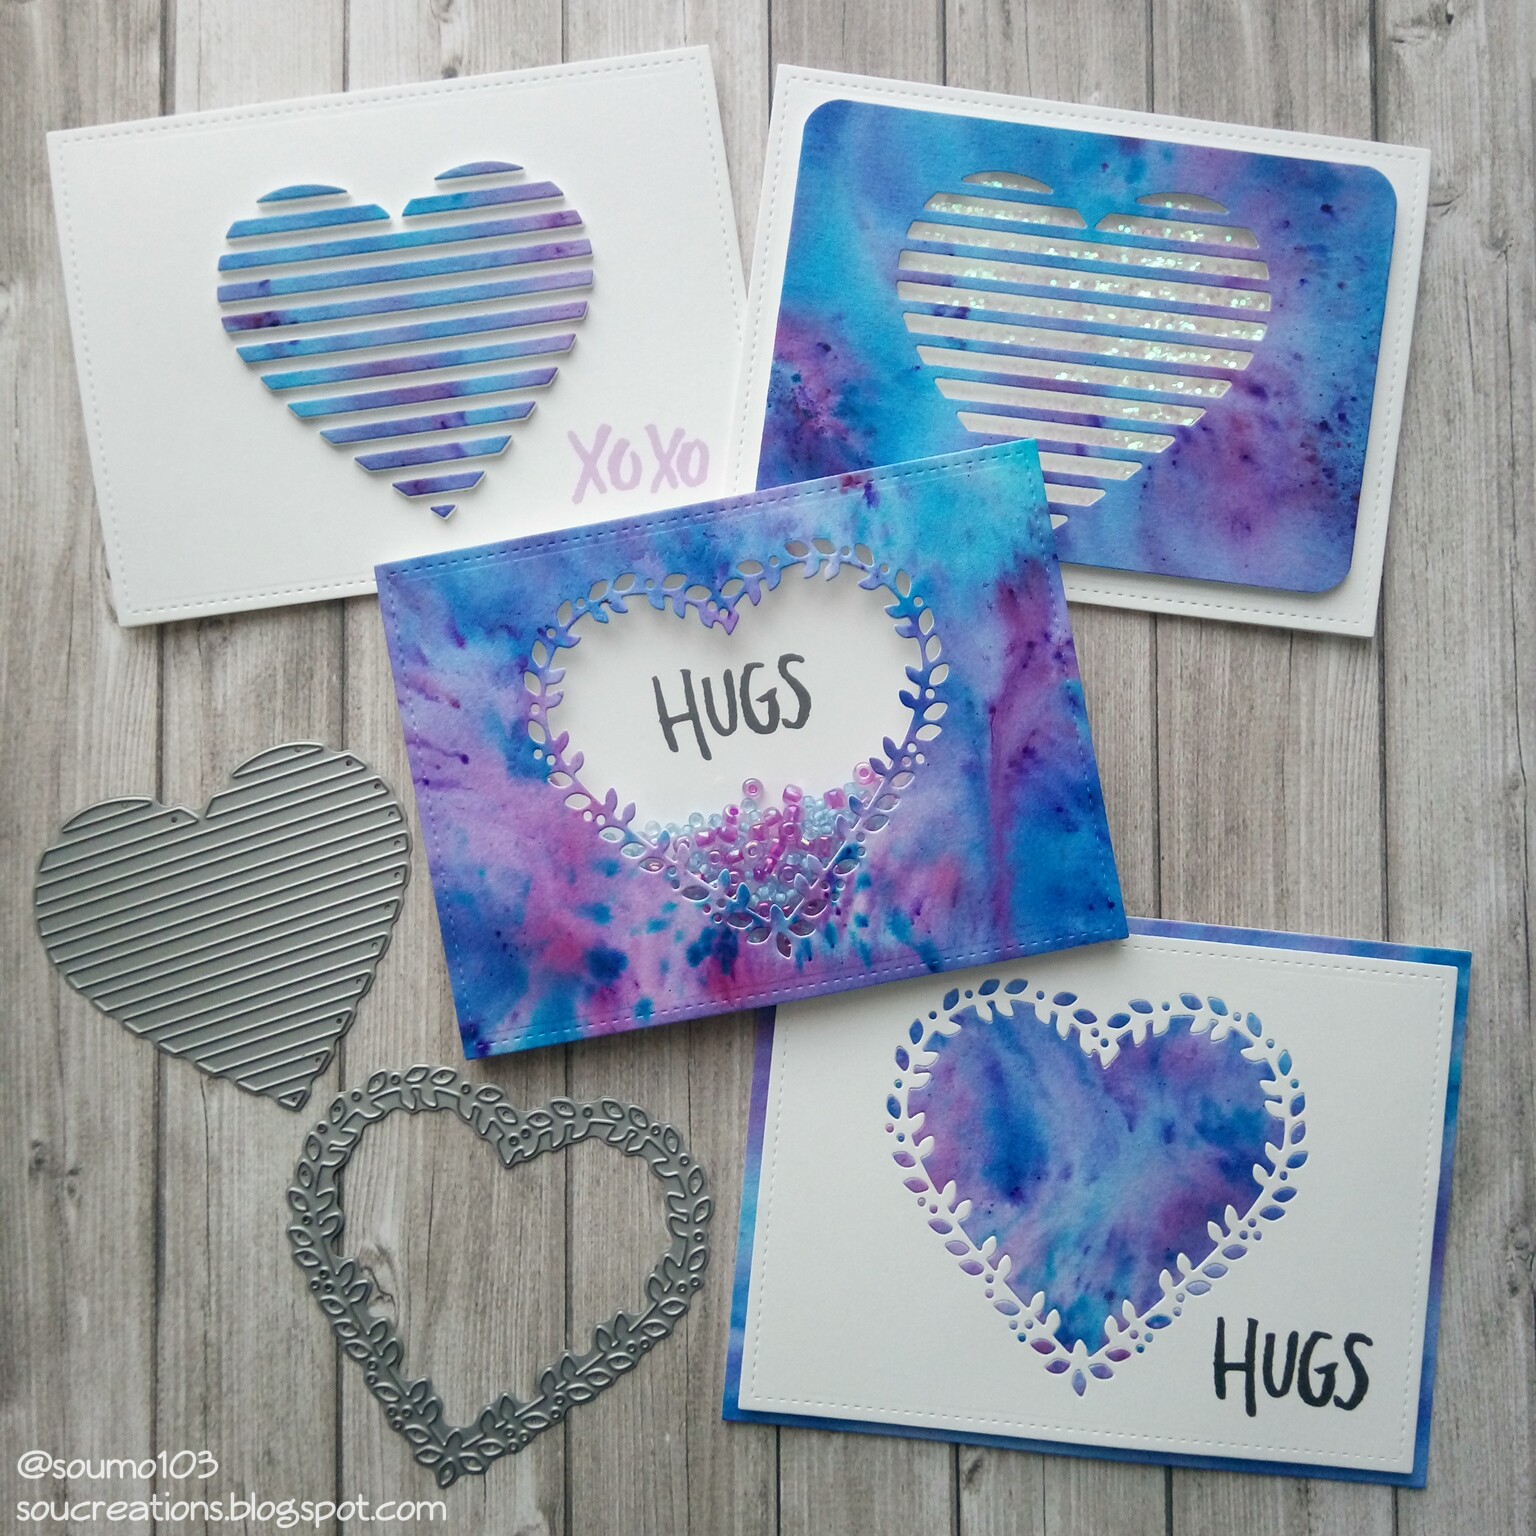
Now, let's move onto my cards! I made four cards using both heart dies from the Layers of love die set (Concord & 9th).
I decided to play with "Brusho Crystal Colors". They're super easy to use and I love the fun and amazing backgrounds one can create using them!
I sprinkled the powders (Purple, Turquoise and Ultra Marine) onto watercolor paper, spritzed with water and set aside to dry.
Passons aux cartes, maintenant. J'ai réalisé quatre cartes avec les deux dies en coeur du set Layers of love (Concord & 9th).
Pour mes fonds, j'ai choisi du "Brusho Crystal Colors". Ces poudres sont très simples à utiliser et j'aime vraiment l'effet que l'on obtient!
J'ai saupoudré les poudres (Mauve, Turquoise et Ultra Marine) sur du papier aquarelle, vaporisé de l'eau dessus et laissé sécher.


For these two cards, I die cut a window using the open heart out of the Brusho panel.
I saved all the small die cut pieces of the Brusho heart.
I die cut the heart again from a white rectangle panel and inlaid the small Brusho die cut pieces.
I stamped the sentiment from the Tree hugs (Concord & 9th) stamp set with black ink.
I assembled the shaker parts (Brusho panel + acetate + foam adhesive), added some beads and adhered to a top fold card base.
Pour ces deux cartes, j'ai coupé dans mon panneau Brusho avec le die en forme de coeur ouvert.
J'ai gardé tous les petits morceaux de la découpe à savoir l'intérieur du coeur ainsi que toutes les petites pièces autour du coeur.
J'ai ensuite à nouveau couper avec le même coeur dans un panneau rectangulaire blanc. J'ai collé ce panneau sur une base de carte et rempli les espaces vides comme un puzzle avec les pièces mises de côté précédemment.
Le sentiment du set Tree hugs (Concord & 9th) a été tamponné à l'encre noire.
J'ai assemblé les éléments de la shaker (Panneau Brusho + acétate + foam adhésif), j'ai ajouté quelques perles et adhéré le tout sur une base de carte.


For these two cards, I die cut the striped heart out of the Brusho panel and from fun foam. I glued them together.
I die cut the heart again from a white rectangle panel and inlaid the mounted strips.
I stamped the sentiment from the Tree hugs (Concord & 9th) stamp set with Fresh Lavender ink (Lawn Fawn).
I assembled the shaker parts (Brusho panel + acetate + foam adhesive), I added some glitter flakes and adhered to a top fold card base.
Pour ces deux cartes, j'ai coupé dans mon panneau Brusho avec le die en forme de coeur ligné et dans du fun foam également. Je les ai collés ensemble.
J'ai à nouveau coupé un coeur ligné dans un panneau rectangulaire blanc et incrusté les lignes dans les espaces vides.
Le sentiment du set Tree hugs (Concord & 9th) a été tamponné à l'encre "Fresh Lavender" (Lawn Fawn).
J'ai assemblé la shaker (Panneau Brusho + acétate + fun foam), j'ai ajouté des flocons pailletés et adhéré le tout à ma base de carte.


Supplies / Matériel
Dies: Stitched rectangle dies (Lawn Fawn), Rectangle infinity dies (Hero Arts), Layers of love die (Concord & 9th)
Stamps/Tampons: Tree hugs (Concord & 9th)
Coloring Medium/Colorisation: Brusho Crystal Colors
Inks/Encres: Intense Black ink (Hero Arts), Fresh Lavender ink (Lawn Fawn)
Accessories/Accessoires: Mini Mister Spray (Ranger), Beads/Perles, Glitter flakes/Flocons pailletés

Thank you so much for stopping by today! I hope you enjoyed my cards.
Merci de votre visite! J'espère que ces cartes vous ont plues.

November 03, 2016

Poinsettia (Mama Elephant)

Hi everyone,
Hope you're all having a great day!
I'm back today with a bunch of watercolor floral cards.
I haven't pulled out my Gansai Tambi watercolors in a while and I'm glad I pulled them out! Had so much fun making these cards! ^_^
Coucou tout le monde,
J'espère que vous passez une super journée!
Je suis de retour aujourd'hui avec quelques cartes florales réalisées à l'aquarelle.
Ça faisait un moment que je n'avais plus utilisé mon Gansai Tambi (peinture aquarelle) et vraiment je suis ravie de l'avoir sorti!
^_^


To create my cards, I started by stamping the poinsettias and the greeting from the Poinsettia stamp set onto watercolor paper (4 1/4" square) with Versamark ink and heat embossed with white embossing powder.
I used Gansai Tambi watercolors to color in the flowers and the backgrounds. Then set them aside to dry.
The colors I used are shown below the following photos.
Pour réaliser ces cartes, j'ai commencé par tamponner les poinsettias et le sentiment du set Poinsettia sur du papier aquarelle (carré mesurant +/- 10,8cm) avec de l'encre Versamark et embossé à chaud avec de la poudre blanche.
J'ai ensuite peint les fleurs et les fonds avec les aquarelles Gansai Tambi et les ai mis de côté en attendant qu'ils sèchent.
Vous pouvez trouver les couleurs utilisées sous les photos qui suivent.


Gansai Tambi watercolors
Flowers/Fleurs: No.32 - No.30
Backgrounds/Fonds: No.44
Splatters/Éclaboussures: No.91

Next, I die cut the frames (red, silver, gold and silver mirror cardstock) and the inside of the frames (white cardstock) using the Union square frame die.
Finally, I adhered the watercolor panels, the frames and inside frames to a top fold card base.
Ensuite, j'ai coupé à l'aide du die Union square frame les cadres (cardstocks rouge, argenté, feuilles mirroir or et argent) ainsi que les intérieurs de cadres (cardstock blanc).
Pour terminer, j'ai adhéré les panneaux aquarellés, les cadres et intérieurs de cadres à mes bases de cartes.


Gansai Tambi watercolors
Flowers/Fleurs: No.30 - No.32
Backgrounds/Fonds: No.61
Splatters/Éclaboussures: Silver paint

Supplies / Matériel
Stamp/Tampon: Poinsettia (Mama Elephant)
Die: Union square frame die (Mama Elephant)
Papers/Papiers: Canson watercolor paper, colored cardstock, mirror cardstock
Ink/Encre: Versamark ink
Coloring Medium/Colorisation: Gansai Tambi watercolors
Embossing powder/Poudre à embosser: Opaque bright white (Wow)

Thank you so much for stopping by, hope you enjoyed these cards. See you next time!
Merci beaucoup de votre visite, j'espère que ces cartes vous ont plu. À bientôt!